Advertisement
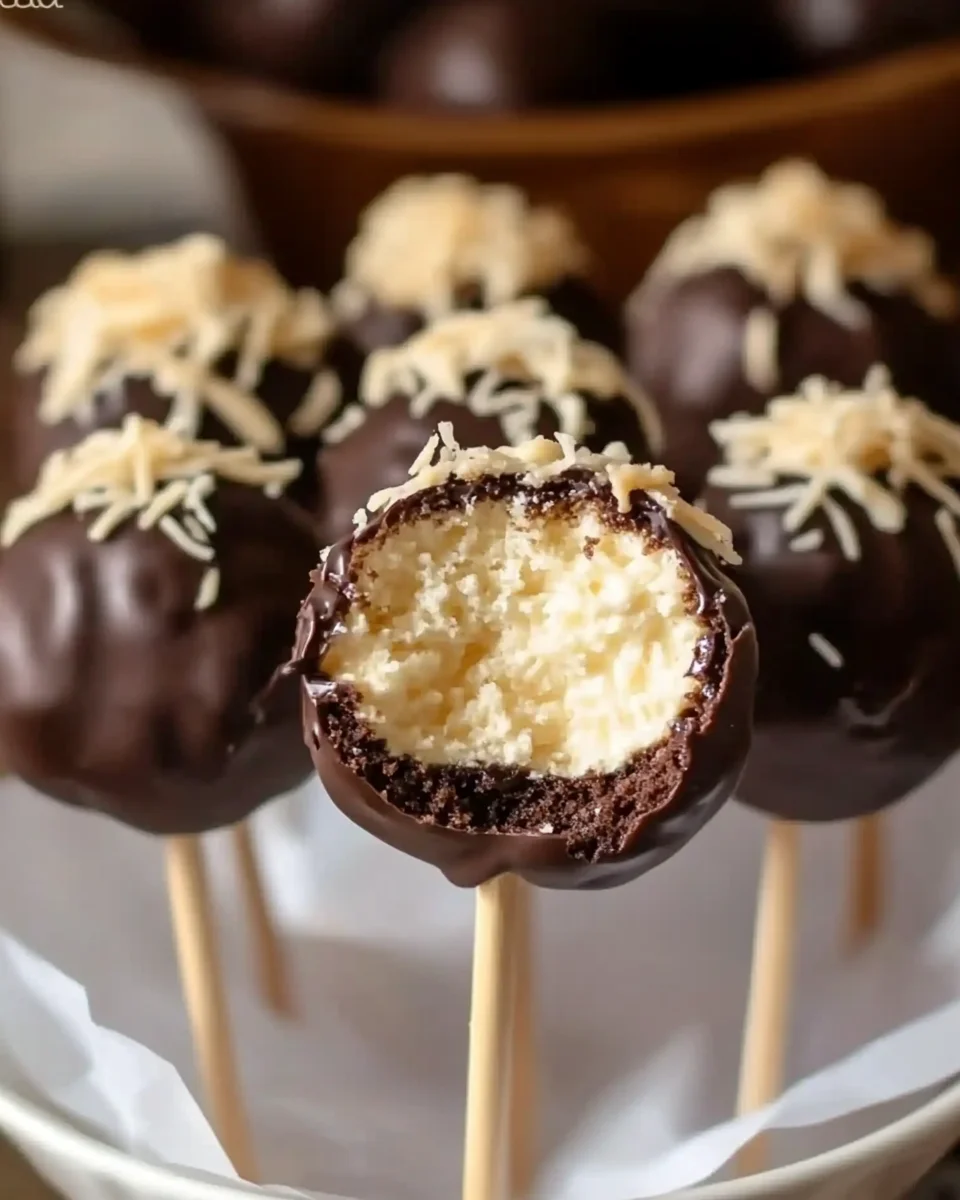
Few desserts are as fun and versatile as cake pops. When you add a cheesecake twist to the mix, you’ve got a treat that’s not only delicious but also irresistibly creamy. This Easy Cheesecake-Stuffed Cake Pops Recipe is perfect for parties, gifts, or just satisfying your sweet tooth. With a few simple steps, you can create these delightful pops that are sure to impress everyone.
Why You’ll Love This Recipe
Cake pops are already a crowd favorite, but this cheesecake-stuffed version takes them to a whole new level. Here’s why you’ll love making and eating these treats:
- Simple Yet Elegant: Easy to make but looks like a professional dessert.
- Customizable: Use your favorite cake mix and toppings.
- Perfect for Any Occasion: Great for birthdays, holidays, or just because.
- Kid-Friendly: Fun to make and eat with little helpers.
Ingredients You’ll Need
Here’s everything you need to make these cheesecake-stuffed cake pops:
Advertisement
| Ingredient | Amount |
|---|---|
| Cream cheese (softened) | 8 ounces |
| Powdered sugar | 1/2 cup |
| Sour cream | 1/4 cup |
| Vanilla extract | 1 teaspoon |
| Cake mix (any flavor) | 1 box |
| Ingredients for cake mix | As per box instructions |
| Frosting (store-bought or homemade) | 1 cup |
| Chocolate chips or melting chocolate | 1 cup |
| Sprinkles, crushed nuts, or other toppings | Optional |
| Lollipop sticks | As needed |
Step-by-Step Instructions
Step 1: Prepare the Cheesecake Filling
- In a medium bowl, beat the cream cheese, powdered sugar, sour cream, and vanilla extract until smooth and creamy.
- Chill the mixture in the refrigerator for about 30 minutes to firm up.
Step 2: Bake the Cake
- Bake the cake according to the instructions on the box. Allow it to cool completely.
Step 3: Crumble the Cake and Add Frosting
- Once the cake is cool, crumble it into a large bowl.
- Add the frosting and mix until fully combined. The mixture should be moist but firm enough to hold its shape.
Step 4: Roll Into Balls
- Roll the cake mixture into small balls, about 1 inch in diameter.
- Insert a lollipop stick into each ball and place them on a baking sheet.
- Chill in the refrigerator for 1 hour.
Step 5: Stuff with Cheesecake Filling
- Take a chilled cake ball and make a small indentation in the center.
- Add a small spoonful of the cheesecake mixture into the indentation.
- Smooth the cake mixture around the filling to seal it.
- Roll the ball gently between your hands to reshape.
Step 6: Melt the Chocolate
- Melt the chocolate chips or melting chocolate in a microwave-safe bowl or using a double boiler. Stir until smooth.
Step 7: Dip and Decorate
- Dip each cake pop into the melted chocolate, ensuring it is completely coated.
- Gently tap off any excess chocolate and place the dipped cake pops in a stand or foam block to set.
- While the chocolate is still wet, add sprinkles, crushed nuts, or other toppings if desired.
Step 8: Let Set and Serve
- Allow the chocolate coating to harden completely before serving.
- Store the cake pops in an airtight container in the refrigerator until ready to enjoy.
Tips for Success
Use Room Temperature Ingredients
- Ensure the cream cheese and sour cream are softened to avoid lumps in the filling.
Chill the Mixture
- Chilling both the cheesecake filling and cake balls helps them hold their shape during assembly.
Experiment with Flavors
- Try different cake mix flavors like chocolate, red velvet, or lemon to change things up.
Use Quality Chocolate
- High-quality melting chocolate ensures a smooth, glossy coating for your cake pops.
Nutritional Information
Here’s an approximate nutritional breakdown per cake pop (based on a batch of 24):
| Nutrient | Amount (Approx.) |
|---|---|
| Calories | 150 |
| Total Fat | 8g |
| Carbohydrates | 18g |
| Protein | 2g |
| Sugar | 12g |
Note: Nutritional values may vary based on portion size and specific ingredients used.
Frequently Asked Questions
1. Can I make these ahead of time?
Yes! You can prepare the cake pops a day or two in advance. Store them in an airtight container in the refrigerator until ready to serve.
2. Can I use homemade cake instead of a box mix?
Absolutely! A homemade cake works just as well as a box mix.
3. How do I prevent the cake pops from falling off the sticks?
Ensure the cake mixture is firm and chilled before inserting the sticks. Dipping the sticks in melted chocolate before inserting them can also help.
4. Can I freeze cake pops?
Yes, you can freeze cake pops for up to a month. Thaw them in the refrigerator before serving.
5. What’s the best way to melt chocolate?
Use a microwave in 15-second intervals, stirring after each, or a double boiler to ensure even melting without burning.
6. Can I make a gluten-free version?
Yes! Use a gluten-free cake mix and ensure all other ingredients are gluten-free.
Creative Variations
Holiday-Themed Cake Pops
- Use red and green sprinkles for Christmas or pastel colors for Easter.
Peanut Butter Cheesecake Pops
- Add a spoonful of peanut butter to the cheesecake filling for a nutty twist.
Chocolate-Dipped Strawberry Cake Pops
- Use strawberry cake and drizzle with white chocolate for a fruity flavor.
Birthday Cake Pops
- Use funfetti cake mix and colorful sprinkles for a festive touch.
Serving Suggestions
These Easy Cheesecake-Stuffed Cake Pops pair perfectly with:
- A hot cup of coffee or tea for a delightful afternoon treat.
- A dessert platter with cookies and brownies for a party spread.
- A glass of milk for a nostalgic snack.
Final Thoughts
Cheesecake-Stuffed Cake Pops are the ultimate combination of creamy, sweet, and indulgent. They’re easy to make, customizable, and always a hit at gatherings. Whether you’re making them for a special occasion or just because, these cake pops are guaranteed to delight.
Advertisement
Ready to get started? Gather your ingredients, follow the steps, and enjoy creating a dessert that’s as fun to make as it is to eat. Don’t forget to share this recipe with friends and family for a sweet treat they’ll love!
Print
Easy Cheesecake-Stuffed Cake Pops Recipe
- Total Time: 45 minutes
- Yield: Approximately 24 cake pops
Description
Cheesecake-Stuffed Cake Pops are the perfect blend of creamy cheesecake and moist cake, coated in chocolate and topped with sprinkles. These delightful treats are fun to make, customizable, and a hit for any occasion.
Ingredients
- 8 ounces cream cheese, softened
- 1/2 cup powdered sugar
- 1/4 cup sour cream
- 1 teaspoon vanilla extract
- 1 box cake mix (any flavor)
- Ingredients required for the cake mix (as per box instructions)
- 1 cup frosting (store-bought or homemade)
- 1 cup chocolate chips or melting chocolate
- Optional toppings: sprinkles, crushed nuts, or candy
- Lollipop sticks
Instructions
- Prepare the Cheesecake Filling:
- In a medium bowl, beat the cream cheese, powdered sugar, sour cream, and vanilla extract until smooth and creamy.
- Chill the mixture in the refrigerator for 30 minutes to firm up.
- Bake the Cake:
- Bake the cake according to the instructions on the box. Allow it to cool completely.
- Crumble the Cake and Add Frosting:
- Crumble the cooled cake into a large bowl.
- Mix in the frosting until the texture is moist but firm enough to hold its shape.
- Roll Into Balls:
- Roll the cake mixture into 1-inch balls and place them on a baking sheet.
- Insert a lollipop stick into each ball and chill in the refrigerator for 1 hour.
- Stuff with Cheesecake Filling:
- Make a small indentation in each chilled cake ball and add a small spoonful of the cheesecake mixture.
- Smooth the cake mixture around the filling to seal it and roll gently to reshape.
- Melt the Chocolate:
- Melt the chocolate chips or melting chocolate in a microwave-safe bowl or using a double boiler. Stir until smooth.
- Dip and Decorate:
- Dip each cake pop into the melted chocolate, ensuring it is fully coated.
- Tap off excess chocolate and place the dipped pops in a stand or foam block to set.
- Add sprinkles, crushed nuts, or other toppings while the chocolate is still wet.
- Set and Serve:
- Allow the chocolate to harden completely before serving.
- Store in an airtight container in the refrigerator until ready to enjoy.
Notes
- Use high-quality chocolate for a smooth, glossy finish.
- Adjust the filling flavor by adding a splash of almond or lemon extract.
- Cake pops can be stored in the freezer for up to a month.
- Prep Time: 20 minutes
- Cook Time: 25 minutes
- Category: Dessert
- Method: No-Bake and Baking
- Cuisine: American