Advertisement
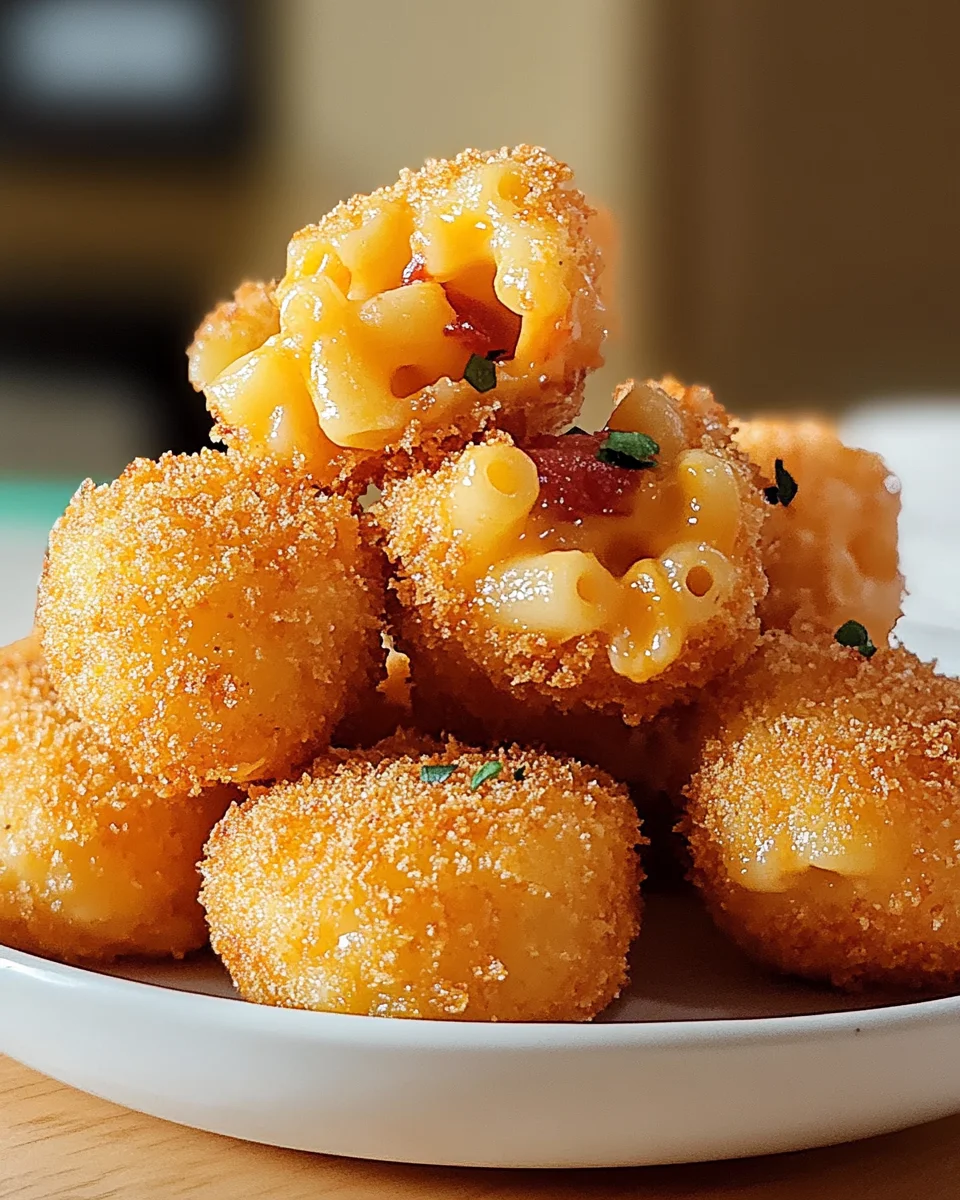
Who can resist the crispy, golden shell of a fried mac and cheese ball, revealing a gooey, cheesy center with bits of savory bacon? This Fried Mac & Cheese Balls Recipe is the ultimate comfort food treat, perfect for parties, snacks, or indulgent evenings at home. Easy to make and endlessly satisfying, these cheesy bites will quickly become a favorite in your kitchen.
Why You’ll Love This Recipe
Fried Mac & Cheese Balls are everything you love about macaroni and cheese, transformed into a portable, bite-sized snack. Here’s why you’ll fall in love with this recipe:
- Crispy and Cheesy: The perfect combination of textures and flavors.
- Customizable: Add different cheeses, spices, or even jalapeños.
- Great for Sharing: Perfect for parties or game-day snacks.
- Simple Ingredients: Easy to find and budget-friendly.
Ingredients You’ll Need
| Ingredient | Amount |
|---|---|
| Elbow macaroni | 8 oz |
| Butter | 2 tbsp |
| All-purpose flour | 2 tbsp |
| Whole milk | 1 cup |
| Shredded sharp cheddar cheese | 1 1/2 cups |
| Shredded mozzarella cheese | 1/2 cup |
| Cooked and chopped bacon | 4 slices |
| Salt and pepper | To taste |
| Eggs (beaten) | 2 large |
| Breadcrumbs | 1 cup |
| Vegetable oil | For frying |
Step-by-Step Instructions
Step 1: Cook the Macaroni
- Boil 8 ounces of elbow macaroni according to the package instructions until al dente.
- Drain the pasta and set it aside.
Step 2: Make the Cheese Sauce
- In a large pan, melt 2 tablespoons of butter over medium heat.
- Stir in 2 tablespoons of all-purpose flour to form a roux. Cook for 2 minutes, stirring constantly.
- Slowly whisk in 1 cup of whole milk, continuing to stir until the mixture thickens.
- Add 1 1/2 cups of shredded sharp cheddar cheese and 1/2 cup of shredded mozzarella cheese. Stir until the cheese is fully melted and smooth.
- Season the sauce with salt and pepper to taste.
Step 3: Combine Macaroni and Cheese
- Stir the cooked macaroni and 4 slices of chopped bacon into the cheese sauce.
- Transfer the mixture to a shallow dish and refrigerate for at least 30 minutes to firm up.
Step 4: Shape the Balls
- Once the mixture is firm, use a cookie scoop or tablespoon to shape it into small balls.
- Place the balls on a parchment-lined baking sheet.
Step 5: Coat the Balls
- Dip each ball into beaten eggs, ensuring it’s fully coated.
- Roll the ball in breadcrumbs, pressing gently to adhere the coating.
Step 6: Fry the Balls
- Heat vegetable oil in a deep fryer or large pot to 375°F (190°C).
- Fry the mac and cheese balls in batches, cooking for 2-3 minutes until golden and crispy.
- Remove the balls from the oil and drain them on paper towels.
Step 7: Serve and Enjoy
- Serve the fried mac and cheese balls warm with your favorite dipping sauces, such as marinara, ranch, or spicy aioli.
Tips for Success
Chill the Mixture
- Refrigerating the mac and cheese mixture is essential for shaping firm balls that won’t fall apart during frying.
Double-Coat for Extra Crispiness
- For a thicker, crunchier coating, repeat the egg and breadcrumb steps.
Test the Oil Temperature
- Use a thermometer to ensure the oil stays at 375°F. Too hot, and the balls may burn; too cool, and they’ll absorb excess oil.
Experiment with Cheeses
- Try adding Parmesan, Gruyère, or pepper jack for different flavors.
Nutritional Information
Here’s an approximate breakdown of the nutritional content per serving (2 balls):
Advertisement
| Nutrient | Amount (Approx.) |
|---|---|
| Calories | 250 |
| Total Fat | 14g |
| Carbohydrates | 20g |
| Protein | 8g |
| Sodium | 350mg |
Note: Nutritional values may vary based on portion size and specific ingredients used.
Frequently Asked Questions
1. Can I make these ahead of time?
Yes! Prepare the mac and cheese balls and refrigerate them for up to 24 hours before frying.
2. Can I bake instead of fry?
Absolutely. Preheat your oven to 400°F (200°C), place the coated balls on a baking sheet, and bake for 15-20 minutes, turning halfway through.
3. Can I freeze the mac and cheese balls?
Yes, freeze the uncooked balls on a baking sheet, then transfer them to a freezer bag. Fry or bake directly from frozen, adding a few extra minutes to the cooking time.
4. What dipping sauces pair well with these?
Try marinara, ranch, barbecue sauce, honey mustard, or a spicy aioli for added flavor.
5. Can I make these gluten-free?
Yes! Use gluten-free pasta, flour, and breadcrumbs.
6. What’s the best oil for frying?
Vegetable oil, canola oil, or peanut oil works well due to their high smoke points.
Creative Variations
Spicy Jalapeño Mac & Cheese Balls
- Add diced jalapeños to the cheese sauce for a spicy kick.
Buffalo-Style Mac & Cheese Balls
- Toss the fried balls in buffalo sauce for a tangy, spicy flavor.
Vegetarian Option
- Omit the bacon and add cooked spinach or roasted red peppers for a veggie twist.
Truffle Mac & Cheese Balls
- Add a drizzle of truffle oil to the cheese sauce for a gourmet touch.
Serving Suggestions
These Fried Mac & Cheese Balls are perfect for:
- Appetizers: Serve at parties or gatherings with an assortment of dipping sauces.
- Game-Day Snacks: A hit with sports fans and snack enthusiasts.
- Comfort Food Nights: Pair with a fresh salad for a satisfying meal.
Final Thoughts
Fried Mac & Cheese Balls are the perfect blend of comfort food and finger food. They’re cheesy, crispy, and irresistibly delicious, making them a hit at any event or as a simple indulgence at home. Plus, they’re versatile enough to customize with your favorite ingredients and flavors.
Advertisement
Ready to make these irresistible treats? Gather your ingredients, follow the steps, and enjoy the satisfaction of creating a dish that’s sure to be a crowd-pleaser. Share this recipe with friends and family, and let the mac and cheese magic begin!
Print
Fried Mac & Cheese Balls Recipe
- Total Time: 30 minutes
- Yield: Approximately 20 balls
Description
Crispy on the outside and gooey on the inside, these Fried Mac & Cheese Balls are the ultimate comfort food snack. Packed with creamy cheese and savory bacon, they’re perfect for parties, game days, or indulgent evenings at home.
Ingredients
- 8 oz elbow macaroni
- 2 tablespoons butter
- 2 tablespoons all-purpose flour
- 1 cup whole milk
- 1 1/2 cups shredded sharp cheddar cheese
- 1/2 cup shredded mozzarella cheese
- 4 slices cooked and chopped bacon
- Salt and pepper, to taste
- 2 large eggs, beaten
- 1 cup breadcrumbs
- Vegetable oil, for frying
Instructions
- Cook the Macaroni:
- Boil the elbow macaroni according to the package instructions until al dente. Drain and set aside.
- Prepare the Cheese Sauce:
- In a large pan, melt the butter over medium heat. Stir in the flour to create a roux and cook for 2 minutes.
- Gradually whisk in the milk and continue stirring until the mixture thickens.
- Add the cheddar and mozzarella cheeses, stirring until melted and smooth. Season with salt and pepper.
- Combine and Chill:
- Stir the cooked macaroni and chopped bacon into the cheese sauce.
- Transfer the mixture to a shallow dish and refrigerate for at least 30 minutes to firm up.
- Shape the Balls:
- Once the mixture is firm, use a cookie scoop or tablespoon to shape it into small balls. Place them on a parchment-lined baking sheet.
- Coat the Balls:
- Dip each ball into the beaten eggs, ensuring full coverage.
- Roll the balls in breadcrumbs, pressing gently to adhere the coating.
- Fry the Balls:
- Heat vegetable oil in a deep fryer or large pot to 375°F (190°C).
- Fry the mac and cheese balls in batches for 2-3 minutes, or until golden and crispy.
- Remove and drain on paper towels.
- Serve:
- Serve the fried mac and cheese balls warm with dipping sauces like marinara, ranch, or spicy aioli.
Notes
- Ensure the mac and cheese mixture is well chilled before shaping to make it easier to handle.
- For a crunchier coating, repeat the egg and breadcrumb steps for a double coat.
- These can be baked at 400°F (200°C) for 15-20 minutes if you prefer a healthier alternative.
- Prep Time: 20 minutes
- Cook Time: 10 minutes
- Category: Appetizer/Snack
- Method: Frying
- Cuisine: American


