Advertisement
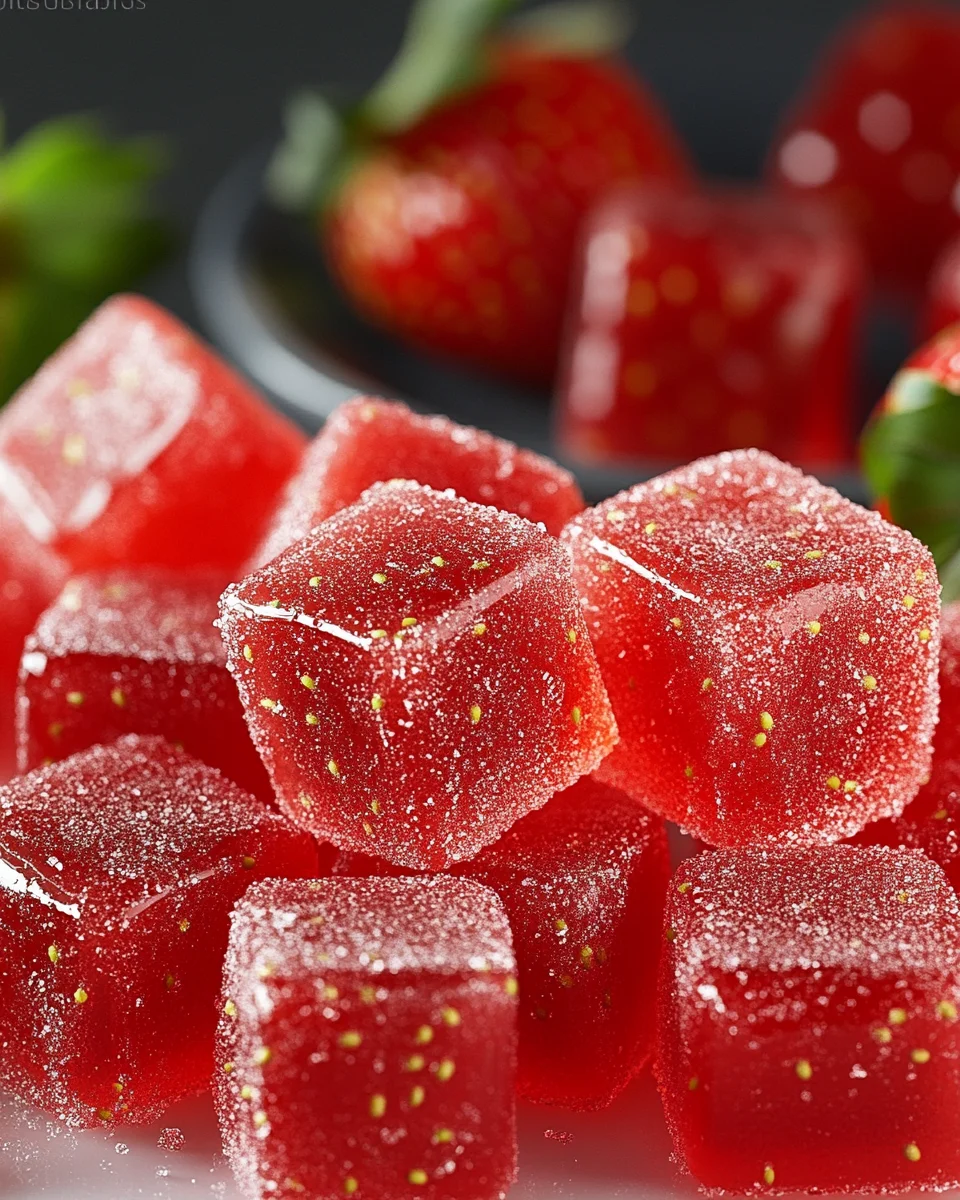
Imagine the perfect balance of tangy and sweet in a chewy, bite-sized treat that’s not only delicious but also good for you. Healthy Sour Strawberry Gummies with Real Fruit are the perfect solution for your snack cravings. Made with fresh strawberries and wholesome ingredients, these gummies are easy to make and packed with natural flavor. Let’s dive into how you can whip up a batch of these delightful treats!
Why You’ll Love This Recipe
These Healthy Sour Strawberry Gummies are not just another snack; they’re a homemade alternative to sugary store-bought candies. Here’s why you’ll love them:
- Made with Real Fruit: No artificial flavors or colors.
- Easy to Make: Just a few simple steps and minimal ingredients.
- Naturally Sweetened: Sweetened with honey, making them a healthier option.
- Customizable: Adjust the tartness and sweetness to suit your taste.
- Kid-Friendly: A great way to sneak in some extra fruit for the little ones.
Ingredients You’ll Need
Here’s a detailed breakdown of the ingredients for these sour strawberry gummies:
Advertisement
| Ingredient | Amount |
|---|---|
| Fresh strawberries | 1 1/2 cups, hulled and chopped |
| Water | 1/2 cup |
| Lemon juice | 2 tablespoons |
| Honey | 2 tablespoons |
| Gelatin powder | 3 tablespoons |
| Granulated sugar | 1/4 cup (for coating) |
Step-by-Step Instructions
Step 1: Blend the Fruit Mixture
- In a blender, combine the hulled and chopped strawberries, water, and lemon juice.
- Blend until the mixture is completely smooth.
Step 2: Heat the Mixture
- Pour the blended mixture into a medium saucepan and heat it over medium-low heat.
- Stir in the honey and continue to heat until the mixture is warm but not boiling.
Step 3: Add the Gelatin
- Sprinkle the gelatin powder evenly over the warm mixture while whisking constantly to avoid lumps.
- Keep stirring until the gelatin is fully dissolved, resulting in a smooth texture.
Step 4: Pour and Set
- Pour the mixture into silicone molds or a lined baking dish for easy removal.
- Place the mold or dish in the refrigerator and let it chill for at least 2 hours or until the gummies are fully set.
Step 5: Cut and Coat
- If using a baking dish, remove the set mixture and cut it into bite-sized pieces.
- Roll each gummy in granulated sugar to give it a light coating and a sour kick.
Step 6: Store Properly
- Transfer the gummies to an airtight container and store them in the refrigerator. They will stay fresh for up to a week.
Tips for Success
Use Fresh Strawberries
- Fresh, ripe strawberries will give your gummies the best flavor. Frozen strawberries can be used, but ensure they are thawed and drained.
Avoid Boiling
- Heating the mixture too much can alter the flavor and texture. Keep the heat low and steady.
Customize Sweetness and Tartness
- Adjust the honey and lemon juice quantities to make the gummies sweeter or more sour, depending on your preference.
Chill Thoroughly
- Ensure the gummies are fully set in the refrigerator before removing them from the molds.
Nutritional Information
Here’s an approximate nutritional breakdown per serving (4-5 gummies):
| Nutrient | Amount (Approx.) |
|---|---|
| Calories | 25 |
| Total Fat | 0g |
| Carbohydrates | 6g |
| Protein | 1g |
| Sugar | 5g |
Note: Nutritional values may vary based on portion size and specific ingredients used.
Frequently Asked Questions
1. Can I use other fruits?
Yes! You can substitute strawberries with other berries like raspberries, blueberries, or blackberries. Mangoes and peaches also work well.
2. Are these gummies vegan?
This recipe uses gelatin, which is not vegan. To make a vegan version, substitute the gelatin with agar-agar and adjust the cooking process slightly.
3. Can I make them sugar-free?
Absolutely! Use a sugar substitute like stevia or erythritol for coating, and adjust the honey to your preference.
4. How long do these gummies last?
When stored in an airtight container in the refrigerator, the gummies can last up to one week.
5. Can I skip the granulated sugar coating?
Yes, the coating is optional. The gummies taste great on their own if you prefer to skip the sugar.
6. What molds should I use?
Silicone molds work best as they’re flexible and make it easy to remove the gummies once set.
Creative Variations
Spicy Strawberry Gummies
- Add a pinch of cayenne pepper or chili powder to the mixture for a spicy kick.
Citrus Explosion
- Mix orange or lime juice with the lemon juice for a zesty twist.
Berry Medley
- Blend a mix of strawberries, raspberries, and blueberries for a multi-berry flavor.
Chocolate Coated Gummies
- Dip the set gummies in melted dark chocolate and let them harden for a decadent treat.
Serving Suggestions
These Healthy Sour Strawberry Gummies are perfect for:
- Lunchbox Treats: A fun, fruity snack for kids.
- Party Favors: Pack them in cute bags or jars for party giveaways.
- Midday Pick-Me-Up: A quick and energizing snack to satisfy sweet cravings.
Final Thoughts
Healthy Sour Strawberry Gummies with Real Fruit are a delicious, guilt-free way to enjoy a classic snack. They’re easy to make, endlessly customizable, and packed with natural flavor. Whether you’re looking for a healthy treat for yourself or a fun recipe to share with family and friends, these gummies are sure to be a hit.
Advertisement
Ready to try them out? Gather your ingredients, follow the steps, and enjoy the satisfaction of making your own homemade gummies. Share this recipe with friends and inspire them to create their own fruity creations!
Print
Healthy Sour Strawberry Gummies with Real Fruit
- Total Time: 30 minutes
- Yield: AApproximately 40 gummies
Description
Chewy, tangy, and naturally sweet, these Healthy Sour Strawberry Gummies are made with fresh strawberries and wholesome ingredients. Perfect as a guilt-free snack, they’re quick and easy to prepare and packed with real fruit flavor.
Ingredients
- 1 1/2 cups fresh strawberries, hulled and chopped
- 1/2 cup water
- 2 tablespoons lemon juice
- 2 tablespoons honey
- 3 tablespoons gelatin powder
- 1/4 cup granulated sugar (optional, for coating)
Instructions
- Blend the Fruit Mixture: Combine the strawberries, water, and lemon juice in a blender. Blend until smooth.
- Heat the Mixture: Pour the blended mixture into a medium saucepan. Heat over medium-low heat and stir in the honey. Warm the mixture gently without boiling.
- Incorporate Gelatin: Sprinkle the gelatin powder over the warm mixture, whisking constantly to dissolve it completely and prevent lumps. Stir until smooth.
- Pour into Molds: Transfer the mixture to silicone molds or a parchment-lined baking dish for easy removal. Use a spoon or a small funnel for precision.
- Chill: Refrigerate the molds or dish for at least 2 hours, or until the gummies are fully set.
- Cut and Coat (Optional): If using a baking dish, remove the set mixture and cut it into bite-sized pieces. Roll each gummy in granulated sugar for a sour coating, if desired.
- Store: Transfer the gummies to an airtight container and store them in the refrigerator for up to one week.
Notes
- Use fresh, ripe strawberries for the best flavor. Frozen strawberries can be used but should be thawed and drained first.
- Adjust the sweetness and tartness by varying the amount of honey and lemon juice.
- To make a vegan version, substitute gelatin with agar-agar, following the package instructions for setting liquids.
- Prep Time: 10 minutes
- Cook Time: 20 minutes
- Category: Snack/Dessert
- Method: No-Bake
- Cuisine: American